SpringMVC加载过程及原理
一.springMvc 核心类DispathcerServlet 类继承关系
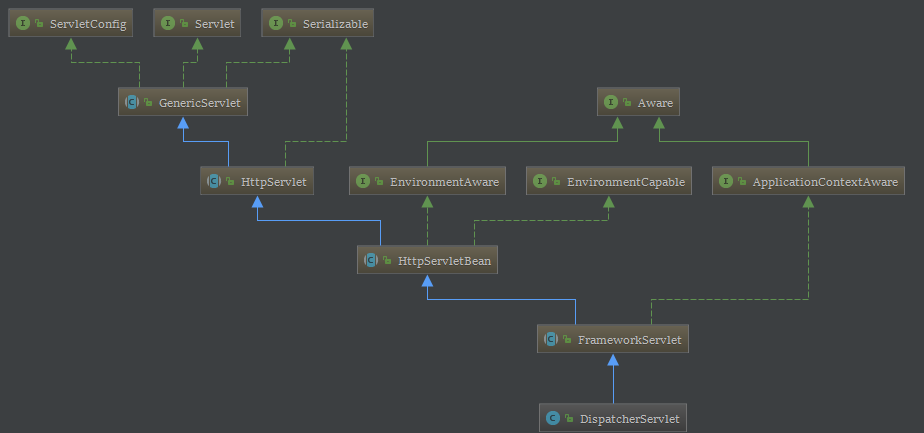
可以看出有两条主要的继承关系:1. 将它标记为servlet;2.让它有感知环境和应用上下文的能力
二.web.xml的加载过程一次是context-param > listener > fileter > servlet**,由于DispathcerServlet是一个Servelet 容器将执行标准的Servelet初始化
- GenericServlet中的初始化方法init将会运行,由于子类(HttpServletBean)实现了初始化方法,根据父子类的初始化关系,所以将会执行HttpServletBean中的init方法,该方法主要代码如下
public final void init() throws ServletException {
    if (this.logger.isDebugEnabled()) {
        this.logger.debug("Initializing servlet '" + this.getServletName() + "'");
    }

    try {
        PropertyValues pvs = new HttpServletBean.ServletConfigPropertyValues(this.getServletConfig(), this.requiredProperties);
        BeanWrapper bw = PropertyAccessorFactory.forBeanPropertyAccess(this);
        ResourceLoader resourceLoader = new ServletContextResourceLoader(this.getServletContext());
        bw.registerCustomEditor(Resource.class, new ResourceEditor(resourceLoader, this.getEnvironment()));
        this.initBeanWrapper(bw);
        bw.setPropertyValues(pvs, true);
    } catch (BeansException var4) {
        this.logger.error("Failed to set bean properties on servlet '" + this.getServletName() + "'", var4);
        throw var4;
    }

    this.initServletBean();
    if (this.logger.isDebugEnabled()) {
        this.logger.debug("Servlet '" + this.getServletName() + "' configured successfully");
    }

}
可以看到里面将会加载web中配置的初始化参数和配置文件,setPropertyValues方法会将从init-param中读取的参数设置到DispatcherServlet的相关字段(Field)中。 然后执行 this.initServletBean();方法。
-
initServletBean()是个空方法,子类FrameworkServlet重写了,将执行FrameworkServlet的initServletBean方法,该方法如下:
protected final void initServletBean() throws ServletException {
    this.getServletContext().log("Initializing Spring FrameworkServlet '" + this.getServletName() + "'");
    if (this.logger.isInfoEnabled()) {
        this.logger.info("FrameworkServlet '" + this.getServletName() + "': initialization started");
    }

    long startTime = System.currentTimeMillis();

    try {
        this.webApplicationContext = this.initWebApplicationContext();
        this.initFrameworkServlet();
    } catch (ServletException var5) {
        this.logger.error("Context initialization failed", var5);
        throw var5;
    } catch (RuntimeException var6) {
        this.logger.error("Context initialization failed", var6);
        throw var6;
    }

    if (this.logger.isInfoEnabled()) {
        long elapsedTime = System.currentTimeMillis() - startTime;
        this.logger.info("FrameworkServlet '" + this.getServletName() + "': initialization completed in " + elapsedTime + " ms");
    }

}
这里初始化了webApplicationContext,initWebApplicationContext()方法是重点,如果WebApplicationContext已经初始化,则刷新,如果没有则创建
protected WebApplicationContext initWebApplicationContext() {
    WebApplicationContext rootContext = WebApplicationContextUtils.getWebApplicationContext(this.getServletContext());
    WebApplicationContext wac = null;
    if (this.webApplicationContext != null) {
        //有可能DispatcherServlet被作为Spring bean初始化,且webApplicationContext已被注入进来
        wac = this.webApplicationContext;
        if (wac instanceof ConfigurableWebApplicationContext) {
            ConfigurableWebApplicationContext cwac = (ConfigurableWebApplicationContext)wac;
            if (!cwac.isActive()) {
                if (cwac.getParent() == null) {
                    cwac.setParent(rootContext);
                }

                this.configureAndRefreshWebApplicationContext(cwac);
            }
        }
    }

    if (wac == null) {
        wac = this.findWebApplicationContext();
    }

    if (wac == null) {
        wac = this.createWebApplicationContext(rootContext);
    }

    if (!this.refreshEventReceived) {
        this.onRefresh(wac);
    }

    if (this.publishContext) {
        String attrName = this.getServletContextAttributeName();
        this.getServletContext().setAttribute(attrName, wac);
        if (this.logger.isDebugEnabled()) {
            this.logger.debug("Published WebApplicationContext of servlet '" + this.getServletName() + "' as ServletContext attribute with name [" + attrName + "]");
        }
    }

    return wac;
}
this.configureAndRefreshWebApplicationContext(cwac) 中的refresh方法如下,
public void refresh() throws BeansException, IllegalStateException { Object var1 = this.startupShutdownMonitor; synchronized(this.startupShutdownMonitor) { this.prepareRefresh(); ConfigurableListableBeanFactory beanFactory = this.obtainFreshBeanFactory(); this.prepareBeanFactory(beanFactory); try { this.postProcessBeanFactory(beanFactory); this.invokeBeanFactoryPostProcessors(beanFactory); this.registerBeanPostProcessors(beanFactory); this.initMessageSource(); this.initApplicationEventMulticaster(); this.onRefresh(); this.registerListeners(); this.finishBeanFactoryInitialization(beanFactory); this.finishRefresh(); } catch (BeansException var9) { if (this.logger.isWarnEnabled()) { this.logger.warn("Exception encountered during context initialization - cancelling refresh attempt: " + var9); } this.destroyBeans(); this.cancelRefresh(var9); throw var9; } finally { this.resetCommonCaches(); } } -
继续完成一些初始化信息,里面有个onRefresh方法,接下来Dispatcher中onRefresh将会执行
protected void onRefresh(ApplicationContext context) {
    this.initStrategies(context);
}

protected void initStrategies(ApplicationContext context) {
    this.initMultipartResolver(context);
    this.initLocaleResolver(context);
    this.initThemeResolver(context);
    this.initHandlerMappings(context);
    this.initHandlerAdapters(context);
    this.initHandlerExceptionResolvers(context);
    this.initRequestToViewNameTranslator(context);
    this.initViewResolvers(context);
    this.initFlashMapManager(context);
}
里面初始化视图解析器,处理器映射器等,这些都初始化之后,web容器初始化完成。
三.发送请求
当发送请求时,DispatcherServlet的 doService()方法被调用,而里面最核心的方法就是doDispatch(request, response); 该方法的源码如下:
protected void doDispatch(HttpServletRequest request, HttpServletResponse response) throws Exception {
   HttpServletRequest processedRequest = request;
   HandlerExecutionChain mappedHandler = null;
   boolean multipartRequestParsed = false;

   WebAsyncManager asyncManager = WebAsyncUtils.getAsyncManager(request);

   try {
      ModelAndView mv = null;
      Exception dispatchException = null;

      try {
         processedRequest = checkMultipart(request);
         multipartRequestParsed = (processedRequest != request);

         // Determine handler for the current request.
        // 1.是查找处理器执行链,包含处理器和拦截器
         mappedHandler = getHandler(processedRequest);
         if (mappedHandler == null) {
            noHandlerFound(processedRequest, response);
            return;
         }

         // Determine handler adapter for the current request.//查找对于当前请求的处理器适配器
         HandlerAdapter ha = getHandlerAdapter(mappedHandler.getHandler());

         // Process last-modified header, if supported by the handler.
         String method = request.getMethod();
         boolean isGet = "GET".equals(method);
         if (isGet || "HEAD".equals(method)) {
            long lastModified = ha.getLastModified(request, mappedHandler.getHandler());
            if (new ServletWebRequest(request, response).checkNotModified(lastModified) && isGet) {
               return;
            }
         }
         //2.调用拦截器的前置处理方法
         if (!mappedHandler.applyPreHandle(processedRequest, response)) {
            return;
         }

         // Actually invoke the handler.调用处理器的处理方法,这里就是具体的controller中的方法, 并返回modeland view
         mv = ha.handle(processedRequest, response, mappedHandler.getHandler());

         if (asyncManager.isConcurrentHandlingStarted()) {
            return;
         }

         applyDefaultViewName(processedRequest, mv);
         //3.调用执行链的后置方法,即调用拦截器的后置方法
         mappedHandler.applyPostHandle(processedRequest, response, mv);
      }
      catch (Exception ex) {
         dispatchException = ex;
      }
      catch (Throwable err) {
         // As of 4.3, we're processing Errors thrown from handler methods as well,
         // making them available for @ExceptionHandler methods and other scenarios.
         dispatchException = new NestedServletException("Handler dispatch failed", err);
      }
      processDispatchResult(processedRequest, response, mappedHandler, mv, dispatchException);
   }
   catch (Exception ex) {
      triggerAfterCompletion(processedRequest, response, mappedHandler, ex);
   }
   catch (Throwable err) {
      triggerAfterCompletion(processedRequest, response, mappedHandler,
            new NestedServletException("Handler processing failed", err));
   }
   finally {
      if (asyncManager.isConcurrentHandlingStarted()) {
         // Instead of postHandle and afterCompletion
         if (mappedHandler != null) {
            mappedHandler.applyAfterConcurrentHandlingStarted(processedRequest, response);
         }
      }
      else {
         // Clean up any resources used by a multipart request.
         if (multipartRequestParsed) {
            cleanupMultipart(processedRequest);
         }
      }
   }
}
代码中 getHandler(processedRequest) 方法 返回值是HandlerExecutionChain,即处理器执行链,该对象包含处理器和拦截器; 然后查找处理器适配器,执行拦截起的preHandle方法,继续执行处理器Controller,接下来就是拦截器的后置方法postHandle,最后在方法processDispatchResult中渲染视图
那么我们可以总结出 springmvc的调用步骤
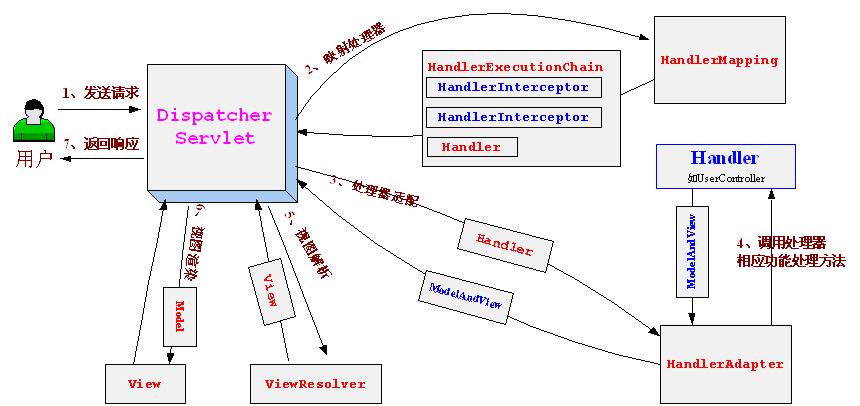
1、 用户发送请求至前端控制器DispatcherServlet。
2、 DispatcherServlet收到请求调用HandlerMapping处理器映射器。
3、 处理器映射器找到具体的处理器(可以根据xml配置、注解进行查找),
生成处理器对象及处理器拦截器(如果有则生成)一并返回给DispatcherServlet。
4、 DispatcherServlet根据处理器找到HandlerAdapter处理器适配器。
5、 HandlerAdapter经过适配调用具体的处理器(Controller)
6、 Controller执行完成返回ModelAndView。
7、 HandlerAdapter将controller执行结果ModelAndView返回给DispatcherServlet。
8、 DispatcherServlet将ModelAndView传给ViewReslover视图解析器。
9、 ViewReslover解析后返回具体View。
10、DispatcherServlet根据View进行渲染视图(即将模型数据填充至视图中)。
11、 DispatcherServlet响应用户。
分享到: